Public API First Steps
The Scraper API is a powerful and flexible RESTful service designed for developers who need to perform web scraping tasks efficiently and at scale. This API is part of a scraping SaaS platform that allows you to submit, monitor, and manage web scraping jobs programmatically.
Table of Contents
Manage Account
First, you need to create an account at the DataChaser AI platform. After that, you can create an API Key to authenticate requests to other resources or update your account details.
Update User Account
To update your account information:
- Endpoint:
PUT /account - Authentication: API KEY required. You can create an API Key on your DataChaser AI dashboard.
For example, if you are sending the request via Postman, you will add the API KEY in headers as shown below:

- Request Body: JSON object with the fields you want to update (see example below)
- Response: The updated account object
Example Request:
Here are the key components:
name: Your full name (optional)email: Your new email address (optional)password: Your new password (optional, must be at least 8 characters long)cs_id: Your customer ID (optional). You are automatically assigned one after signing up on the DataChaser AI platform.
Example Response:
The API responds with the updated account details.
{
  "name": "Jane Doe",
  "email": "jane.doe@example.com",
  "create_date": "2023-06-17T13:44:06.185683Z"
}
Manage API Keys
API Keys are essential for authenticating your requests to the Web Scraper AI system.
1. Create a New API Key
To create a new API key:
-
Endpoint:
POST /keys -
Authentication: Existing API KEY required.
Note: If it is your first time creating an API key, you need to Sign in and create one manually. Follow these steps:
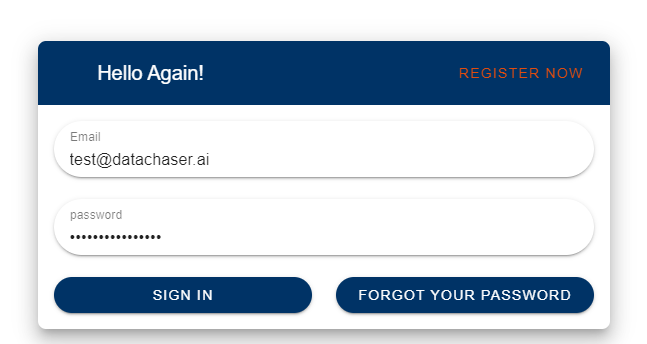
- Sign in with email and password here.
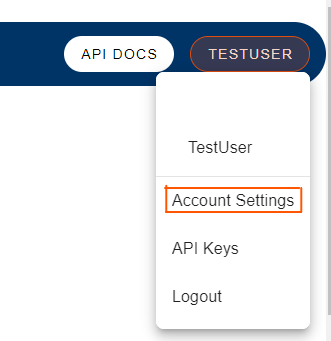
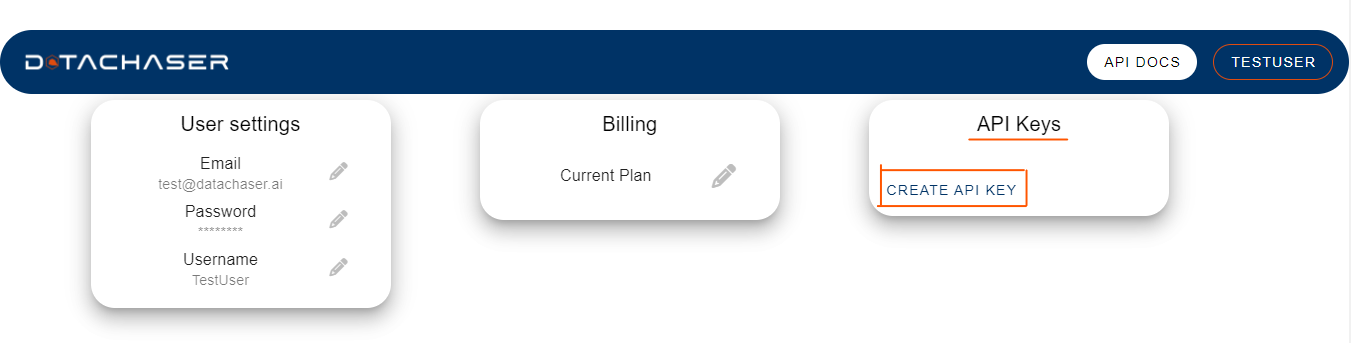
- Click on user profile. On the dropdown, click Account Settings.
- Under Api Keys, click CREATE API KEY.
-
Request Body: JSON object with rate limit information (optional)
-
Response: The newly created API key object
Example Request:
Here are the key components:
rate_limit: An optional object to set usage limits for the new keyinterval: The time frame for the limit (e.g., "hourly", "daily")limit: The maximum number of requests allowed in the specified interval
Example Response:
{
  "apikey": "your_new_api_key_here",
  "rate_limit": {
    "interval": "hourly",
    "limit": 1000
  },
  "created_at": "2024-06-28T13:44:06.185683Z"
}
2. Retrieve All API Keys
To get a list of all your API keys:
- Endpoint:
GET /keys - Authentication: API KEY required
- Response: An array of API key objects
Example Response:
[
  {
    "apikey": "your_api_key_1",
    "rate_limit": {
      "interval": "hourly",
      "limit": 1000
    },
    "created_at": "2024-06-28T13:44:06.185683Z"
  },
  {
    "apikey": "your_api_key_2",
    "rate_limit": {
      "interval": "daily",
      "limit": 10000
    },
    "created_at": "2024-06-29T10:15:30.123456Z"
  }
]
3. Delete an API Key
To delete an existing API key:
- Endpoint:
DELETE /keys - Authentication: API KEY required
- Request Body: JSON object with the API key to delete
- Response: The deleted API key object
Example Request:
Example Response:
{
  "apikey": "api_key_to_delete",
  "rate_limit": {
    "interval": "hourly",
    "limit": 1000
  },
  "created_at": "2024-06-28T13:44:06.185683Z"
}
Now that you have created an account and can manage API Keys, you can access the protected endpoints as follows:
Manage Jobs
A job represents a specific web scraping task that you want to perform.
Job Lifecycle
A typical job goes through the following stages:
- Pending: The job is queued and waiting to be processed.
- In Progress: The scraper is actively working on the job.
- Paused: The scraper has temporarily stopped working on the job.
- Completed: The job has finished successfully.
- Failed: The job encountered an error and could not complete.
- Cancelled: The job was manually cancelled before completion.
Managing Jobs
1. Create a New Job
To create a new scraping job:
- Endpoint:
POST /job - Authentication: API KEY required.
- Request Body: JSON object describing the job (see example below)
- Response: A job object with a unique identifier
Example Request:
Imagine you want to scrape product names from a website and need to click a button to reveal the product list.
{
  "website": "string",
  "actions": [
    {
      "type": "string",
      "selector": "string",
      "text": "string"
    }
  ],
  "data_to_scrape": [
    {
      "field": "string",
      "selector": {
        "type": "string",
        "selector": "string"
      }
    }
  ],
  "frecuency": {
    "value": "string",
    "type": "string"
  }
}
Here are the key components:
website: The target URL to scrape.actions: A list of actions for the scraper to perform before extracting data. Each action has atype(e.g., "click", "type") and aselectorto identify the element.data_to_scrape: Defines what data to extract. Each item specifies afield(the name you want to give the data) and aselector. Theselectoris an object compound of two components: Thetype, which can take eithercss-selectororxpathandselectorwhich is the selector.frequency: Determines how often the job should run. Options include:- daily: Runs once a day.
- weekly: Runs once a week.
- monthly: Runs once a month.
- hourly: Runs once an hour.
- every_x_minutes: Runs every specified number of minutes.
- every_x_hours: Runs every specified number of hours.
- every_x_days: Runs every specified number of days.
- custom: Allows for a custom schedule.
Note: every_x_minutes, every_x_hours, every_x_days and custom options are not yet prepared programmatically, but we expect to receive a cron schedule expression for each option.
Example Response:
The API responds with the created job details.
{
  "id": 5,
  "website": "https://websitetoscrape.com/",
  "actions": [
      {
        "selector": "#button",
        "type": "click",
        "text": "buttonnameexample"
     }
  ],
  "data_to_scrape": [
    {
      "field": "product_name",
      "selector": {
        "type": "css-selector",
        "selector": ".product-title"
      }
    }
  ],
  "frequency": {
    "type": "daily",
    "value": "daily"
  },
  "status": "Pending",
  "created_at": "2024-06-17T13:44:06.185683Z",
  "updated_at": "2024-06-17T13:44:06.185683Z"
}
2. Retrieve a Specific Job
To get details about a particular job:
- Endpoint:
GET /job/{id} - Authentication: API KEY required
- Parameters: Replace
{id}with the job's unique identifier - Response: The job object
Example Request:
3. Update an Existing Job
To modify a job that hasn't started yet:
- Endpoint:
PUT /job/{id} - Authentication: API KEY required
- Parameters: Replace
{id}with the job's unique identifier - Request Body: Updated job configuration (similar to job creation)
- Response: The updated job object
4. Cancel a Job
To cancel a job:
- Endpoint:
DELETE /job/{id} - Authentication: API KEY required
- Parameters: Replace
{id}with the job's unique identifier - Response: The cancelled job object
Example Request:
Example Response:
The job status changes to Cancelled.
5. List All Jobs
To retrieve all your jobs:
- Endpoint:
GET /job - Authentication: API KEY required
- Response: An array of job objects
Example Request:
Example Response:
You get a list of all jobs.
6. Synchronous Job Processing
For small scraping tasks or testing, you can use the synchronous job processing endpoint:
- Endpoint:
POST /job/sync - Authentication: API Key required
- Request Body: Same as job creation
- Response: The scraped data
Retrieve Data
The Data endpoint allows you to retrieve, manage, and delete the data collected by your web scraping jobs.
1. Retrieve All Data
To get all data associated with your account:
-
Endpoint:
GET /data -
Authentication: API KEY required
-
Response: An array of data objects
Example Response:
[
  {
    "id": "data_123456",
    "jobid": "job_789012",
    "data": {
      "product_name": "Example Product",
      "price": "$19.99",
      "description": "This is an example product description."
    },
    "created_at": "2024-06-28T13:44:06.185683Z"
  },
  {
    "id": "data_789012",
    "jobid": "job_345678",
    "data": {
      "article_title": "Breaking News",
      "author": "John Doe",
      "content": "This is the content of the breaking news article."
    },
    "created_at": "2024-06-29T10:15:30.123456Z"
  }
]
The scraped data is returned in a flexible JSON format.
Note: The fields in the data object directly correspond to the data_to_scrape configuration in your job setup. Each field you specify in data_to_scrape will appear as a key-value pair in this data object, where the key is the field name you specified, and the value is the data scraped from the website according to the selector you provided.
For example, in the above example (first element of the array):
-
product_name: This field contains the name of the product that was scraped from the website. In this example, it's "Example Product". -
price: This field contains the price of the product that was scraped. In this case, it's "$19.99".
The structure and content of the data object can vary significantly depending on:
-
The website being scraped, and
-
The specific data points you've configured your job to collect.
For instance, if you had set up your scraping job to collect additional information like product manufacturer or customer ratings, you might see a data object that looks more like this:
"data": {
  "product_name": "Example Product",
  "price": "$19.99",
  "description": "This is an example product description.",
  "manufacturer": "Manufacturer_XYZ",
  "ratings": "4.5/5.0"
}
2. Retrieve Data by Job ID
To get data generated by a specific job:
- Endpoint:
GET /data/job/{id} - Authentication: API KEY required
- Parameters: Replace
{id}with the job's unique identifier - Response: An array of data objects associated with the specified job
Example Request:
Example Response:
[
  {
    "id": "data_123456",
    "jobid": "job_789012",
    "data": {
      "product_name": "Example Product",
      "price": "$19.99",
      "description": "This is an example product description."
    },
    "created_at": "2024-06-28T13:44:06.185683Z"
  }
]
3. Delete Data by ID
To delete a specific data entry:
- Endpoint:
DELETE /data/{id} - Authentication: API KEY required
- Parameters: Replace
{id}with the data's unique identifier - Response: The deleted data object
Example Request:
Example Response:
{
  "id": "data_123456",
  "jobid": "job_789012",
  "data": {
    "product_name": "Example Product",
    "price": "$19.99",
    "description": "This is an example product description."
  },
  "created_at": "2024-06-28T13:44:06.185683Z"
}
4. WebHook for Data Updates
To receive notifications when new data is available:
- Endpoint:
POST /data/user/{id} - Authentication: API KEY required
- Parameters: Replace
{id}with your user ID - Description: This is a webhook that will send a POST request to your specified URL when new data is available for any of your jobs.
Example Webhook Payload:
{
  "id": "data_123456",
  "jobid": "job_789012",
  "data": {
    "product_name": "New Product",
    "price": "$24.99",
    "description": "This is a newly scraped product description."
  },
  "created_at": "2024-06-30T09:30:15.987654Z"
}
Access Logs
Logs provide a detailed record of events that occur during the operation of your web scraping jobs.
1. Retrieve All Logs
To get all logs associated with your account:
-
Endpoint:
GET /logs -
Authentication: API KEY required
-
Response: An array of log objects
Example Response:
[
  {
    "jobid": "job_123456",
    "message": "Job started successfully",
    "level": "INFO",
    "created_at": "2024-06-28T13:44:06.185683Z"
  },
  {
    "jobid": "job_123456",
    "message": "Successfully scraped 50 items",
    "level": "INFO",
    "created_at": "2024-06-28T13:45:12.345678Z"
  },
  {
    "jobid": "job_789012",
    "message": "Failed to access URL: Connection timeout",
    "level": "ERROR",
    "created_at": "2024-06-29T10:15:30.123456Z"
  }
]
Each log entry contains the following fields:
jobid: The unique identifier of the job that generated this log.message: A descriptive message about the event that occurred.level: The severity level of the log. Common levels include:INFO: General information about job execution.WARNING: Potential issues that didn't stop the job but might require attention.ERROR: Serious issues that prevented the job from completing successfully.created_at: The timestamp when the log entry was created.
2. Retrieve Logs by Job ID
To get logs generated by a specific job:
- Endpoint:
GET /log/job/{id} - Authentication: API KEY required
- Parameters: Replace
{id}with the job's unique identifier - Response: An array of log objects associated with the specified job